Change Table Column Values
This dialog can be invoked for Parametric and Lookup tables by clicking the right mouse button in the column header cell or in a range of selected cells in one column. A pop-up menu will appear having Alter Values as a menu option. The dialog provides an easy way to enter values into a column within the Parametric or Lookup Tables. An alternative way to invoke this dialog is to left click on the triangular icon ![]() in the upper left corner of the header table cell. This capability provides similar capability to that in the Alter Values command (for the Parametric table) but it is somewhat more convenient to use.
in the upper left corner of the header table cell. This capability provides similar capability to that in the Alter Values command (for the Parametric table) but it is somewhat more convenient to use.
There are two variations of this dialog for the Parametric and Lookup Tables. The dialog that appears for the Parametric table appears as follows: (See below for the extended form available for Lookup tables).
Parametric Table Variation

The affected rows are displayed at the upper right. By default, the changes will occur for all rows in the table. The rows for which the changes will be applied can be modified as desired. Note that the Professional license allows the number of rows in the table to be increased by setting the value of the Last Row edit box to a value that is greater than the current number of rows. A confirmation will be displayed before the number of rows is increased. The number of rows in a Parametric table can also be increased or decreased using the Insert/Delete Runs command in the Tables menu. The Insert/Delete Lookup Rows provides the same capability for Lookup tables.
The values can either be cleared or set, depending on the radio button setting. Clearing the table in this manner is not really needed since the Cut command in the Edit menu will provide the same capability.
The value to be placed in the first row of the selected row range must be specified in the First Value field. Beneath this field is a second field in which the last value in the range (assuming a linear variation), the increment, a multiplier, or the last value in the range (assuming a logarithmic variation) can be specified, depending on the selection shown in the drop-down control. If Increment is selected, the value of successive rows in the table are determined by adding the value in the increment field to the previous value. Similarly, if Multiplier is selected, successive values are determined by multiplying the previous value by the value indicated in the field. If Last (linear) or Last (log) is selected, the increment or multiplier will be chosen such that the last row is assigned the value that is provided in the box. Only Increment is provided for Date and DateTime variables or Time variables. The Professional license will accept EES variables that have been previously set to fixed values in place of numerical values for the First Value and Increment/Last Value fields. For example, variable Last has been set to 55 in the Equations window and so it can be used in place of a number in the example shown in the figure. The field will not accept a variable if its value has not yet been determined.
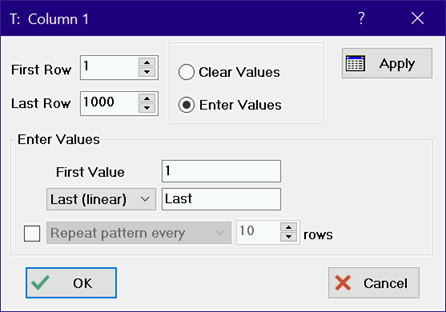
In some situations, it is necessary to fill a table with a pattern of some type. For example, you may wish to enter 1, 2, 3, 4, and 5 in the first 5 rows of the column and then repeat these values in the next five rows and so on down the table. Alternatively, you may wish to enter 1, 1, 1, 1, 1 in the first 5 rows followed by 2, 2, 2, 2, 2 in the next five rows and so on. The capability to enter patterns of this type is provided with the controls that are above the OK and Cancel buttons. Click the check box to enable the controls. Select Repeat Pattern every to enter a repeating pattern of the form 1, 2, 3, 4, 5. Select Apply Pattern Every to enter a sequence such as 1, 1, 1, 1, 1, 2, 2, 2, 2, 2, etc. The pattern is specified by the first value and the last value / increment / multiplier. The pattern repeats every N rows where N is the value you provide. The pattern is applied to rows indicated with the First Row and Last Row controls.
Clicking the Apply button applies the changes to the table, but control remains in the dialog so that additional changes to the data in this column can be made.
Lookup Table Variation
When invoked from a Lookup table, this dialog provides additional capabilities. Values in a column may be entered with an equation similar to the capability of a spreadsheet program, as shown.
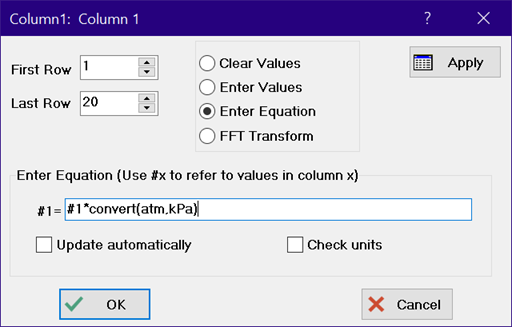
This option allows the values that are entered into the selected column of the table to be determined as a function of values in any column, defined variables in the EES worksheet and EES functions. The #x sequence is used to refer to values in column #x where x is an integer or the name of one of the columns in the table. (The column name is case insensitive; it cannot contain square brackets.) . Note that the equation can refer to the column that is being changed. In the above figure, the values of P in column 1 will be converted from atm to kPa.
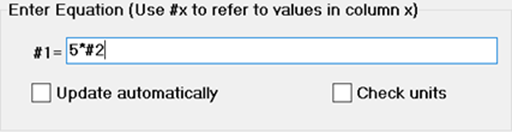
The following entry sets the values in column 1 of the Lookup table to 5* the values in column 2. The changes are applied only to the rows indicated in the edit boxes at the upper left of the dialog.
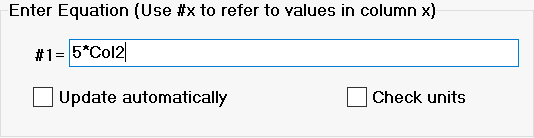
If the name of column 2 is Col2, the entry could equivalently be entered as follows:
.
Any of the EES functions can be used in the equation. For example, the following entry converts temperatures in C (in column 2 of the table) to K.

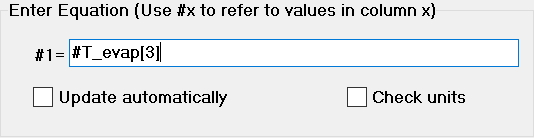
In some cases, it is necessary to refer to a particular row of a column in the Lookup table. This capability is available by including the row number in brackets. For example, the following equation sets all of the values in column 1 to the value in row 3 of the column named T_evap.
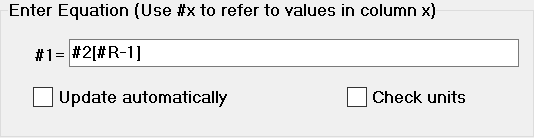
It is sometimes necessary to refer a row above or below the current row for which a value is being entered. #R refers to the current row. #R can be used in a subscript. Entering #2[#R] is exactly equivalent to entering #2. However, you can offset the row values by entering the offset to #R. For example, the following equation copies the values in column 2 to column 1, but it offsets the row so that the value in column 1 row 2 is equal to the value in column 2 row 1, and so on for the entire row range.
Note that EES will not provide an error if the row is less that zero or greater than the maximum number of rows.
The Professional license provides the option to automatically update the values in a column that have been set with an equation. In the example above in which the values in column 1 were set by the equation 5*#2, checking automatic update will result in the values in column 1 automatically changing whenever the values in column 2 are changed. The values in a Lookup table can be changed by the Lookup command in an EES function or EES Macro, by the two , or by entering or pasting values into the table. If the equation in a Lookup table column refers to variables defined in the main program, the table will automatically update after calculations if the values of the variables change.
The Professional license also provides the capabilty of performing a Fast Fourier Transform on data in a column.
If Check units is checked, the units of the entered equation will be checked and a warning will be issued if a units problem is detected.
See also: Alter Values