Add picture from file
Graphic items in bitmap and enhanced metafile format can be added to the Diagram window when it is configured in Development mode simply by first copying the item to the clipboard and then pasting it into the Diagram window. The graphic can then be dragged to the desired location in the window. Clicking the right-mouse button on the item while in Development mode brings up a dialog that allows the item to be edited in a variant of ways, such as scaled, rotated or made transparent.
The Add picture control at the bottom left of the Diagram window toolbar extends this capability in the following ways.
1. The graphic item can be obtained directly from a stored file, rather than from the clipboard.
2. In addition to bitmaps and enhanced meta file, the graphic item may be in many other formats, such as .bmp, .png, .gif, .emf, .jpg .tiff.
3. The filename can be optionally stored in an EES string variable and saved with the EES program. Changing the filename in the string will automatically load and display the desired figure when the Diagram window is shown. The filename may be assigned to an EES string variable within an EES program or using Diagram window objects such as a Text Input, Dropdown list, Radiobutton group or CheckBox group.
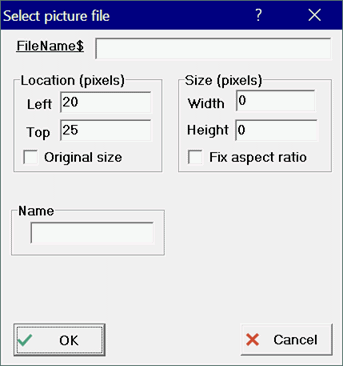
Clicking the Add picture from file button will bring up the following dialog window.
If the edit box to the right of the FileName$ is empty, clicking in the edit box will bring up the Windows Open File dialog to enter the file name. If file preview is enabled, you will be able to see the contents of the selected graphics file. Select the graphics file of interest. If text has already been placed in the edit field, clicking in the edit box will allow editing of the field. You should be sure that the filename entered in the edit box exists Including the file name drive and folder information is recommended, but not necessary if the file is located in the EES folder.
The Location box allows entry of the left top corner of the graphic in the selected Diagram or Child Diagram window. Note that the coordinates are provided in pixels. EES assumes that there are 96 pixels per inch regardless of the setting on your computer.
The Width and Height fields are automatically entered after the file name is selected. However, you can edit these fields to adjust the size of the picture as it appears in the Diagram window. Clicking the Original Size check box control forces the width and height of picture to be reset the values stored in the file. When this control is checked, the Width and Height controls are disabled.
A Name can be optionally provided for this object. If a name is provided, a number EES variables will be created that allow programmatic control over the image. For example, if the name is myPic, EES will create the following variables after clicking the OK button:
myPic.left
myPic.top
myPic.width
myPic.height
myPic.Hide
myPic.transparent
myPic.angle
myPic.FileName$
These attributes can be changed in the EES Equations or Diagram window to affect the picture. Changing myPic.FileName$ to the name of a different graphic file will load and display that file in the Diagram window. The values of the attributes can be copied to EES variables using the GetDiagramAttribute function.
After the graphic item has been selected and displayed in the Diagram window, it can be further edited by clicking the right mouse button on the item while in Development mode, to bring up the Diagram Object Characteristics dialog.
Return to: Diagram window